The Beginner's Guide to 3D Printing
FDM 3D printing has a reputation for being finicky. It isn't — but it rewards people who understand three things: bed adhesion, slicer settings, and filament care. Get those right and you'll be printing successfully within your first week.
Step by step
How to get your first print done
- 1
Pick a printer
For most beginners the choice is between the Bambu Lab A1 Mini (~$300, nearly automatic calibration) and the Creality Ender 3 V3 SE (~$170, more manual but teaches you more). If budget is not the constraint, go Bambu — it gets out of your way. If you want to understand the machine, go Creality. Avoid resin printers until you have a dedicated ventilated workspace.
- 2
Level the bed before anything else
Bed leveling is the single most common cause of failed first prints. If your printer has auto-leveling (ABL), run it. If it is manual, use the paper method: adjust each corner until the nozzle drags across a piece of paper with slight resistance. Do not skip this. A bad first layer means a failed print every time.
- 3
Install OrcaSlicer and load a profile
OrcaSlicer is free, actively maintained, and has built-in profiles for most consumer printers. Download it, select your printer model, and load the default profile. Do not adjust settings yet — use the preset. Understanding why to change settings comes after you have a baseline that works.
- 4
Load PLA filament
PLA is the correct starting filament. It prints at low temperatures (190–220°C), does not warp badly, smells mild, and is forgiving of beginner settings. Buy a name-brand spool — Bambu, eSUN, or Polymaker — not the cheapest no-name on Amazon. Dry it first if it has been sitting: 4–6 hours in a food dehydrator at 45°C removes moisture that causes stringing and popping.
- 5
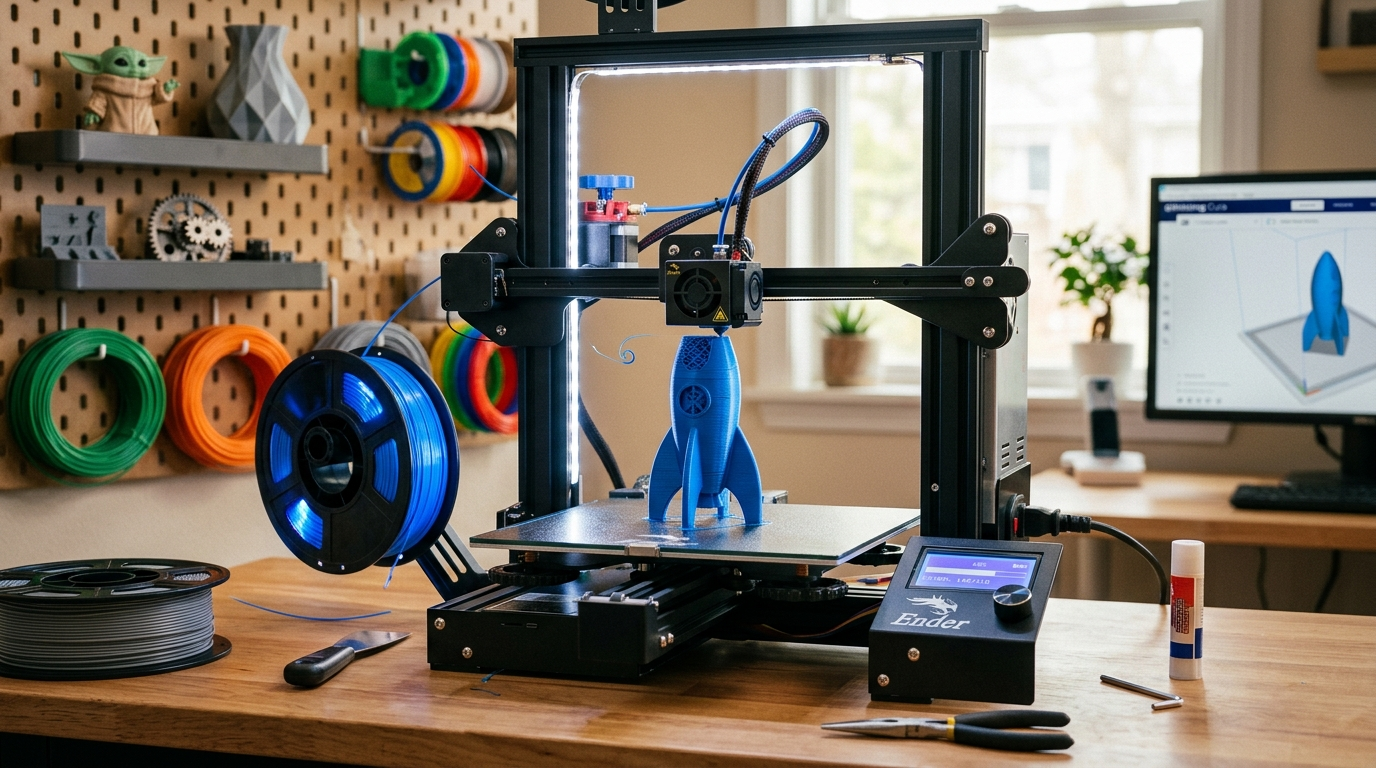
Slice and print the Benchy
The Benchy is a small tugboat model that tests every common print challenge: overhangs, bridges, curves, and small details. Download it from the official site, slice it with the default 0.2mm layer profile, and print it. Your first Benchy will have flaws — that is the point. Use them as diagnostic information, not a failure.
- 6
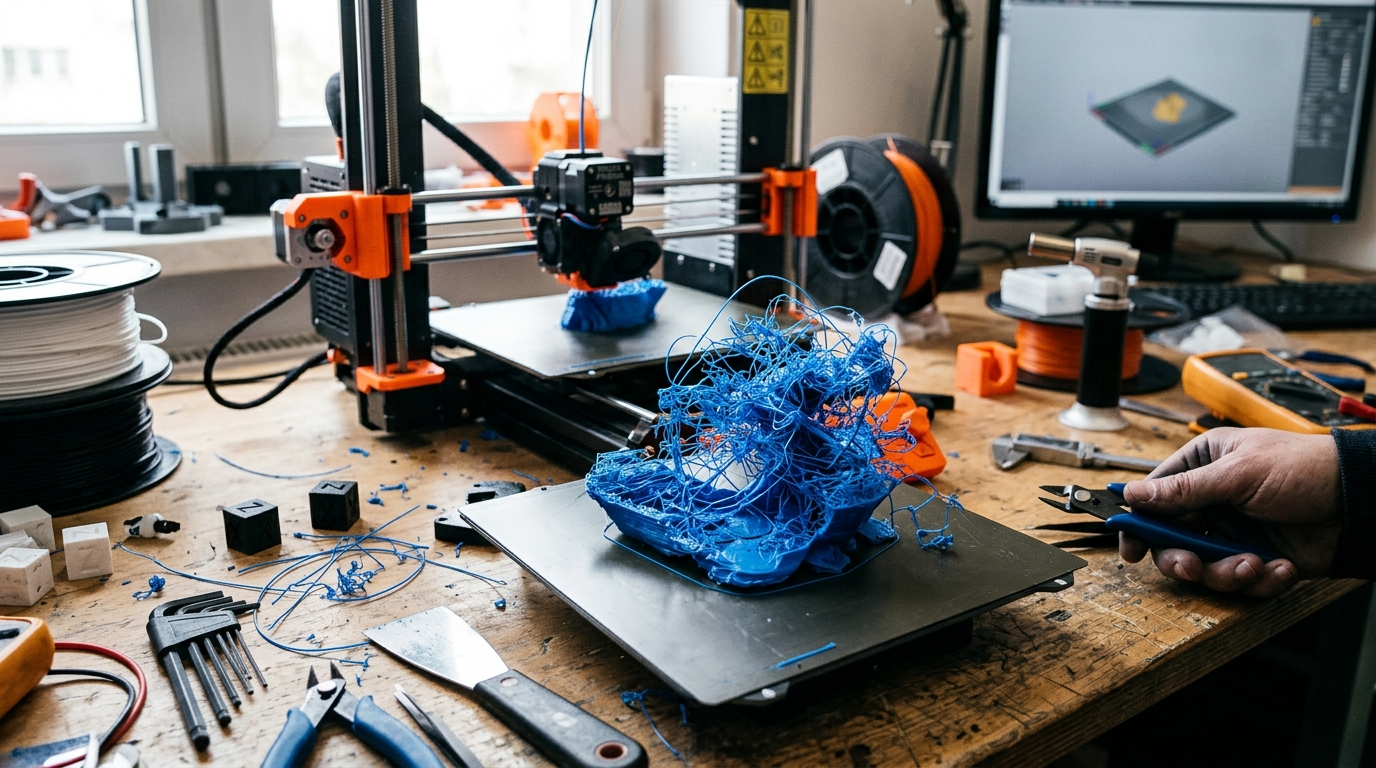
Read the Benchy and iterate
Stringing between towers? Dry your filament or lower print temperature. Rough overhangs? Increase cooling fan speed. Warped base? Clean the bed with IPA and try again. Change one setting at a time when troubleshooting — changing two at once makes it impossible to know what fixed it.
Worth knowing
Things worth knowing early
- ✦
Watch the first layer in person
Never start a print and walk away until the first 2–3 layers are down and look correct. The first layer is the foundation — if it is not right, the entire print will fail. Stop it early rather than letting it run for 3 hours and produce spaghetti.
- ✦
IPA keeps your bed reliable
Wipe your PEI print surface with 99% isopropyl alcohol before every print. Skin oils from handling the surface are invisible but dramatically reduce adhesion. Keep a spray bottle next to the printer.
- ✦
Do not change two settings at once
When something goes wrong, it is tempting to fix everything simultaneously. Resist. Change one variable, print a small test, evaluate. This is the fastest path to a dialed-in printer.
- ✦
Thingiverse is not the best model source anymore
Printables (by Prusa) and Makerworld (by Bambu) have overtaken Thingiverse for quality and curation. Printables in particular has user-reported print settings, which helps beginners know what works before committing to a 6-hour print.
FAQ
Common questions
- QFDM or resin — which should I start with?
- FDM for almost everyone. Resin produces finer detail but involves toxic liquid, requires ventilation, PPE, and a UV curing station, and the workflow is messier. FDM is safer, faster to iterate, and produces prints large enough to be functional. Start with FDM, move to resin only if you specifically need the detail level (miniatures, jewelry).
- QHow much does filament actually cost to run?
- A 1 kg spool of quality PLA runs $18–25 and prints roughly 330 meters of filament. A typical small object (phone stand, small enclosure) uses 50–150 grams. At current prices, filament cost per print is often under $2. Electricity is a minor cost — a 200W printer running 8 hours costs roughly $0.15 at average US rates.
- QWhy does my print keep warping off the bed?
- Warping is almost always caused by one of three things: a dirty bed (clean with IPA), a bed that is not level (re-level), or printing PETG or ABS without an enclosure (start with PLA instead). If you are printing PLA and still warping, lower your cooling fan speed slightly for the first few layers.
- QIs it safe to leave a 3D printer running overnight?
- Modern printers with thermal runaway protection are significantly safer than older machines, but no printer should be left fully unattended for long runs. A reasonable setup: place the printer on a non-flammable surface, install a smoke detector nearby, and use a smart plug to kill power remotely if something looks wrong on a camera. Most serious incidents involve printers without thermal runaway protection.
- QHow long does a typical print take?
- Small objects (30–80mm) at 0.2mm layers take 1–3 hours. Medium objects take 4–8 hours. Large prints can run 12–24+ hours. Draft quality (0.28mm layers) cuts time significantly at the cost of surface finish. Bambu printers run noticeably faster than Creality at equivalent settings due to higher-rated motion systems.
- QDo I need to design my own models?
- No. Printables, Makerworld, and MyMiniFactory host hundreds of thousands of free models. Most beginners print existing models for months before trying 3D design. When you are ready to design, Fusion 360 (free for personal use) and TinkerCAD (browser-based, genuinely easy) are the two most-recommended starting points.
What you can actually make
The real selling point of 3D printing is not the technology — it is the range of things you suddenly have the ability to produce.
Functional objects are where most people find the most value. Cable management clips, wall mounts, replacement parts for appliances, drawer organizers, custom brackets — the kind of thing that used to require a trip to a hardware store or was simply unavailable. When your coffee grinder knob breaks and the part is discontinued, you download the STL and print a replacement in an hour.
Hobby accessories are the second major category. Tabletop gamers print terrain and miniatures. Photographers print lens caps and filter holders. RC hobbyists print body panels and mounts. Whatever else you do, 3D printing tends to become a support tool for it.
Gifts and personalized items — nameplates, custom phone stands, jewelry holders, holiday decorations. Once you understand what the printer can and cannot do dimensionally, you will start seeing gift opportunities everywhere.
Learning projects — printing mechanical assemblies that actually work (hinges, living hinges, snap fits) teaches you CAD tolerances and mechanical design in a hands-on way that no tutorial can replicate.
The practical limit is build volume. A standard FDM printer has a bed around 220×220mm — roughly the footprint of a dinner plate. Anything larger requires splitting into parts and joining them. For most objects people actually want to make, the build volume is more than sufficient.
Filament beyond PLA
Once you have PLA dialed in, the next filaments worth exploring:
- PETG — slightly more flexible than PLA, better heat resistance, food-safe options available. Prints slightly hotter and requires a cleaner bed. Good for functional parts that will see some temperature (car interiors, outdoor use).
- TPU — flexible filament. Phone cases, gaskets, flexible joints. Requires a direct-drive extruder; difficult on Bowden setups.
- ASA / ABS — UV-resistant and heat-resistant. Genuinely difficult to print without an enclosure. Worth learning eventually if you need outdoor durability; not worth the frustration early on.
Start with PLA. Move to PETG when PLA's heat resistance becomes a constraint. Leave ABS and ASA until you have an enclosure and a dialed-in printer.
More guides
3D Printing 101: Getting Started
Everything you need to know to start your 3D printing journey—from choosing your first printer to printing your first object.
3D Print Failures: How to Diagnose and Fix Any Problem
You just pulled a failed print off the bed. Something went wrong — but what? This guide is a visual reference. Find your failure by appearance, follow the cause-and-fix chain, and get back to printing. Every failure is diagnostic information once you know how to read it.