3D Print Failures: How to Diagnose and Fix Any Problem
You just pulled a failed print off the bed. Something went wrong — but what? This guide is a visual reference. Find your failure by appearance, follow the cause-and-fix chain, and get back to printing. Every failure is diagnostic information once you know how to read it.
- Most failures trace back to three things: Z offset, wet filament, or bed temperature — check these before touching any slicer settings
- Change one thing at a time, then run a 20-minute test print — not the full model
- If changing a relevant setting has no effect, the problem is hardware, not settings
- A failure that happens at the same Z height every time is mechanical — no slicer setting can fix it
- Do a cold pull before diagnosing anything structural — it clears partial clogs that mimic hardware failures
How to diagnose any failed print
- 1
Photograph the failure before touching it
Your first instinct is to pull the print off and start over. Don't. Take a photo first — from multiple angles if you can. Once you disturb it you lose information. Note exactly where the failure started: first layer, mid-print, or near the top. That location alone narrows the cause to two or three candidates.
- 2
Identify which phase the failure occurred in
First layer failures (not sticking, warping at base, elephant's foot) are almost always bed-related: leveling, Z offset, surface cleanliness, or bed temperature. Mid-print failures (layer shifting, spaghetti, delamination) are usually mechanical or thermal. Surface failures (stringing, blobs, rough overhangs, ringing) are slicer settings. Knowing the phase cuts your diagnosis in half before you look at anything else.
- 3
Check the filament before the printer
Moisture-absorbed filament causes a surprising number of failures that look like other problems — popping during printing, stringing, rough surfaces, weak layers, inconsistent extrusion. Before changing any settings, ask: was there any crackling or popping during the print? If yes, dry the filament for 4–6 hours at 45°C before anything else. Many apparent 'slicer problems' disappear after drying.
- 4
Find your failure type in this guide
Use the symptom lookup table at the start of the failure reference section below to jump directly to your failure type. Each entry describes what the failure looks like, what caused it, and what to change. If your print matches more than one failure type, start with the most visually dominant one — fix that first, then see what remains.
- 5
Change one setting, print a small test, evaluate
The most common mistake is changing three settings at once. If it improves, you don't know which change helped. If it gets worse, you don't know what caused it. Change one variable at a time. Use a 20-minute test print — a single-wall cube or a small Benchy — to verify the fix before committing to a long run.
Principles that cut diagnostic time
A failure at the same height every time is the printer, not the settings — If your prints consistently fail at the exact same Z height — say, always around 40mm — that's a mechanical issue: a partial clog, a PTFE tube gap at the hot end, or a belt tension problem causing binding at that travel distance. Settings cannot fix hardware.
Most failures trace back to three root causes — In practice, the vast majority of print failures come down to: (1) a bad first layer from bed leveling or Z offset, (2) wet filament causing inconsistent extrusion, or (3) a cooling or adhesion issue mid-print. Check these three before assuming it's a slicer problem or hardware defect.
Print a small test object, not the full model — A 20mm calibration cube or a single-walled box takes 15 minutes to print and tells you 80% of what you need to know about your current settings. Printing a 6-hour model to test a temperature change is how people waste weekends.
Keep a print log — even a basic one — A note in your phone with the filament brand, temperature used, and what went wrong is worth more than a month of random experimentation. When a brand-new spool prints perfectly and an old one strings badly, you'll know exactly why.
Failure questions answered
Why won't my print stick to the bed?
Do I need to re-calibrate before every print?
My print looks fine but snaps easily. What went wrong?
Why does stringing get worse over time on the same spool?
How do I know if a problem is hardware or slicer settings?
My prints warp even though I clean the bed. What else should I check?
What causes layer shifting and how do I fix it?
What is elephant's foot and how do I fix it?
Failure reference
Use the table below to jump directly to your failure type, or scroll through the sections in order.
| What you see | Jump to |
|---|---|
| First layer peeling up, lifting at corners | Not sticking |
| Base of print flares outward wider than the rest | Elephant's foot |
| Gaps or holes in the first layer | Gaps in first layer |
| Edges curl up during the print | Warping |
| Print came loose and left a nest of filament | Print detaches |
| Gaps between walls, grainy or porous surface | Under-extrusion |
| Walls too thick, blobby surface, parts don't fit | Over-extrusion |
| Fine plastic strings between parts | Stringing |
| Wavy ripple pattern on flat walls | Ringing / ghosting |
| Rough or drooping surfaces on steep angles | Overhangs |
| Bumpy pillow-like top surface | Pillowing |
| Random bumps at layer seams | Blobs and zits |
| Print shifted sideways mid-print | Layer shifting |
| Consistent horizontal ridges at regular intervals | Z banding |
| Layers split apart horizontally | Delamination |
| Extruder clicking, then grinding, then nothing | Clogged nozzle |
First layer failures
The first layer is the foundation of every print. If it fails, nothing above it matters. Most first-layer issues come down to three variables: Z offset, bed surface cleanliness, and bed temperature — fix these in that order before touching slicer settings.
Not sticking / lifting at corners
The print peels up from the bed during or shortly after the first layer. Corners lift first, then edges, then the whole part pops free.
Cause: Z offset too high (nozzle too far from bed), dirty bed surface, or bed temperature too low.
Fix: Lower Z offset in 0.05mm increments until the first layer lines merge and have a slight sheen. Clean the PEI surface with 99% IPA — oils from your hands kill adhesion even if the surface looks clean. Raise bed temp to at least 55°C for PLA, 70°C for PETG.
Elephant's foot
The base of the print is noticeably wider than the rest — it flares outward like a skirt at the bottom.
Cause: Z offset too low (nozzle too close to bed), squishing the first layer too hard, or bed temperature too high.
Fix: Raise Z offset in 0.05mm steps until the base matches the wall width of the rest of the print. If the problem persists, reduce bed temperature by 5°C.
Gaps or holes in the first layer
The first layer has visible gaps between extruded lines, or sections simply don't print.
Cause: Z offset too high (not enough squish), or under-extrusion from a partial clog or tangled filament.
Fix: Lower Z offset slightly. Check the filament path for tangles or kinks. Manually push filament through at the extruder while cold — resistance indicates a partial clog.
Warping and adhesion failures
Warping happens when the edges of a print contract as they cool and pull away from the bed. It's more common with large flat parts, fast-cooling environments, and engineering filaments like ABS and ASA.
Warping during the print
The part curls upward at the edges or fully detaches mid-print.
Cause: Thermal contraction pulling the base up. Worse with large flat parts, ABS/ASA filament, and open-air printing near drafts.
Fix: Add a brim in the slicer (4–8mm wide). Raise bed temperature. Turn the part cooling fan off for the first 2–3 layers. Eliminate drafts near the printer.
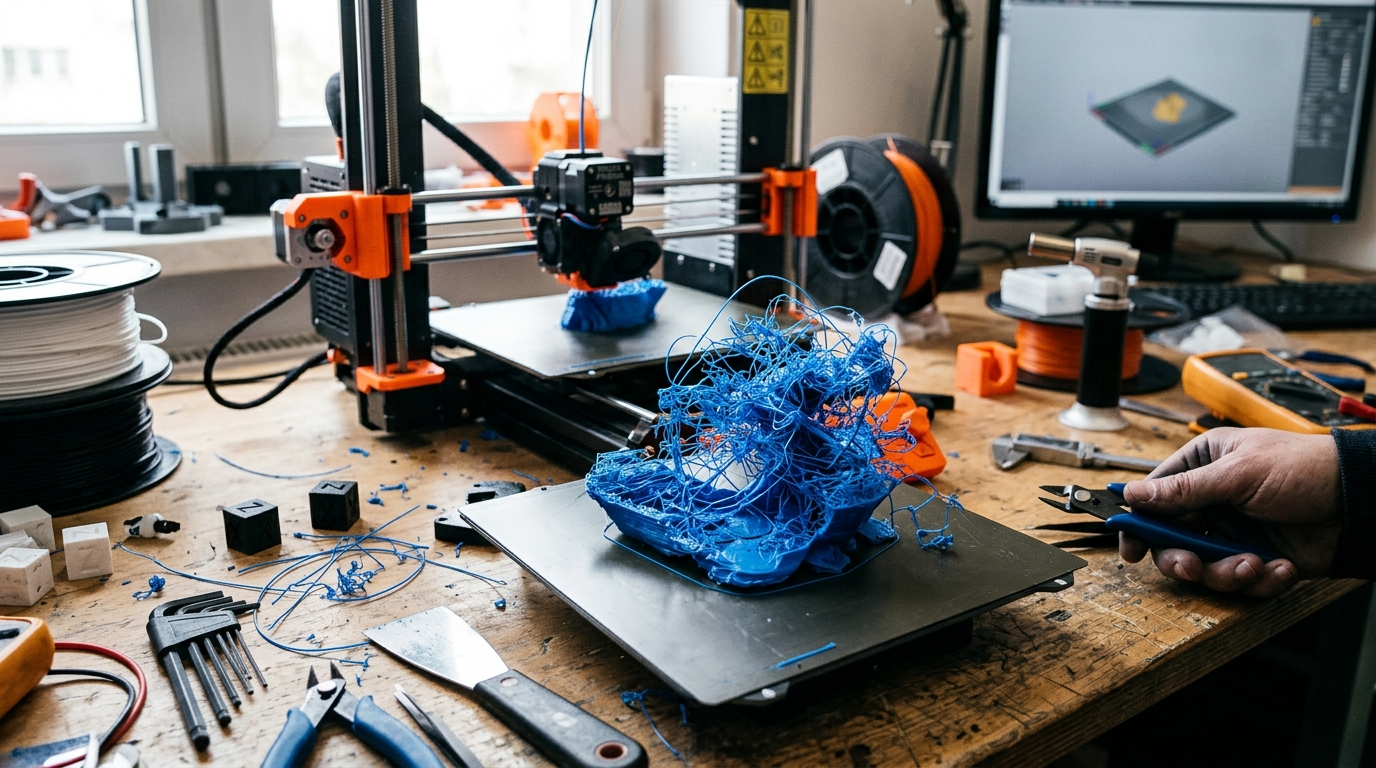
Print detaches entirely
The part comes loose and the nozzle drags through the air, producing a tangled nest of filament.
Cause: Adhesion failure that eventually popped the part free.
Fix: Address the root adhesion issue. This is why you watch the first few layers before walking away — catching a lifting corner at minute three saves the print.
Extrusion failures
Extrusion problems show up as gaps, weak walls, rough surfaces, or over-stuffed bulging walls. The root cause is always the same: the printer is moving too much or too little material.
Under-extrusion
Walls have visible gaps between lines. Infill looks sparse. The surface feels rough or grainy. Layers may not be fully fused.
Cause: Partial clog (most common), wet filament, print temperature too low, or feed tension too low at the extruder.
Fix: Do a cold pull to clear partial clogs. Dry the filament. Raise print temperature by 5°C. Check the extruder gear for filament dust buildup and clean it with a stiff brush.
Over-extrusion
Walls are thicker than the model specifies. The surface has a blobby, rough texture. Parts don't fit together at expected tolerances.
Cause: Flow rate or e-steps calibrated too high.
Fix: Run an e-steps calibration: mark 100mm of filament above the extruder, tell the printer to extrude 100mm, measure how much actually moved. If it moved 105mm, your e-steps are 5% too high. Alternatively, reduce flow rate in the slicer by 2–3% and test.
Surface quality failures
These failures don't compromise structural integrity but make prints look bad. Most are slicer settings issues — or wet filament.
Stringing
Fine threads of plastic bridge the gaps between separate sections of the model, like a spider web.
Cause: Wet filament (the most common and most overlooked cause), retraction too low, travel speed too slow, or print temperature too high.
Fix: Dry the filament first — this solves stringing in the majority of cases. If stringing persists on dry filament, increase retraction distance by 0.5mm increments and raise travel speed to 150mm/s or higher.
Ringing / ghosting
Wavy ripple patterns appear on flat walls, usually immediately after a sharp corner or sudden direction change.
Cause: Vibration from fast acceleration. The printhead overshoots direction changes and the walls record the oscillation.
Fix: Reduce print acceleration in the slicer. Tighten all frame bolts and eccentric nuts. On printers that support it (Bambu, Voron, some Klipper setups), enable input shaping — it almost eliminates ringing entirely.
Rough or drooping overhangs
Surfaces that print at steep angles without support look ragged, stringy, or sag visibly downward.
Cause: Insufficient cooling, temperature too high, or overhangs too steep for the material and cooling setup.
Fix: Increase part cooling fan to 100%. Lower print temperature by 5°C. For overhangs steeper than 50°, add supports in the slicer. PLA handles overhangs better than PETG; PETG sags more and needs more support or lower temperatures.
Pillowing
The top surface of the print looks bumpy and uneven — like a pillow — instead of flat and smooth.
Cause: Too few top layers (the infill pattern telegraphs through), insufficient cooling, or top layer print speed too fast.
Fix: Increase top layers to at least 5 in the slicer (or 1.2mm, whichever is more). Increase part cooling fan speed. Slow the top surface speed to 30–40mm/s. Some slicers have an "ironing" pass that polishes the top surface after it's printed.
Blobs and zits
Random bumps appear on outer walls, often at the same point on each layer — where the nozzle starts or ends an outer perimeter loop.
Cause: Pressure in the nozzle releasing unevenly at layer seams.
Fix: In the slicer, set seam alignment to "rear" to hide seams on the back face of the model. Enable "wipe on retract" if available. Some blobbing at seams is normal and difficult to fully eliminate without post-processing.
Structural failures
Layer shifting
The print suddenly offsets horizontally mid-print and continues printing offset from that point — as if the model was sliced and slid sideways.
Cause: Loose belt on the X or Y axis (most common), acceleration too high for the printer's motion system, or stepper driver overheating.
Fix: Tighten the belts until they produce a low guitar-string tone when plucked. Reduce acceleration in the slicer. Check that the electronics cooling fan is running. If shifting only happens in one direction, focus on the belt for that axis.
Z banding
Consistent horizontal ridges appear at regular intervals — the same pattern repeating every few millimeters around the full print.
Cause: Lead screw irregularity (a slightly bent lead screw or worn anti-backlash nut), eccentric motion in Z, or Z stepper microstepping issues.
Fix: Check the lead screw coupler — if it's loose or misaligned, the screw wobbles with each rotation. Ensure the lead screw is vertical and not binding against the frame. A slightly bent lead screw needs replacing; no amount of slicer tuning fixes mechanical wobble.
Layer delamination
The print separates horizontally — layers can be peeled apart like pages in a book.
Cause: Print temperature too low (layers not fusing), print speed too high, or severely wet filament.
Fix: Raise print temperature by 5°C. Reduce print speed by 20%. Dry the filament.
Hardware — clogged nozzle
A clog has a distinctive progression: the extruder starts clicking intermittently, then skips more frequently, then grinds filament, then stops extruding entirely. Each stage is the same problem getting worse.
Early clog (clicking extruder): The extruder motor is slipping because it can't push filament through the nozzle fast enough. Do a cold pull immediately — push filament in at temperature, let it cool to ~90°C for PLA, then pull it out firmly. The tip will carry debris out with it. Repeat 2–3 times.
Partial clog (inconsistent extrusion): Cold pull first. If that doesn't clear it, heat the nozzle to 20°C above normal printing temp and push filament through manually for 30 seconds. If it still under-extrudes, the clog may be in the PTFE tube or at the throat — disassemble and inspect.
Full clog (no extrusion at all): Try a cold pull at a higher temperature. If nothing comes out, heat to maximum nozzle temp, let it sit for 2 minutes, then try to push filament through manually. If it still won't clear, replace the nozzle — they cost less than an hour of your time.
Hardware vs. settings: quick triage
If changing a relevant setting has no effect on a failure, the problem is mechanical.
| Symptom | Likely hardware cause |
|---|---|
| Fails at the same Z height every time | Partial clog, PTFE gap at hot end, or binding in the motion system |
| Layer shifting in one direction only | Belt loose or stepper issue on that axis |
| Consistent banding at regular Z intervals | Bent or misaligned lead screw |
| Clicking or grinding at the extruder | Clog, retraction too high, or worn extruder gear |
| Stringing gets worse over weeks | Wet filament — dry the spool |
| Random blobs or inconsistent extrusion | PTFE tube gap at hot end, bowden coupler loose |
Reading a list is a great start, but the fastest way to land on something you'll actually keep doing is to match it to your life. The quiz maps your available time, budget, and personality to specific hobbies — including ones you'd never think to search for — in about four minutes. Free, no account needed.
The HobbyStack editorial team researches each guide using practitioner communities, published resources, and direct input from active hobbyists. Every guide is reviewed for accuracy before publication and updated when practices change.
About our editorial process →More guides

3D Printing for Beginners: Which Printer to Buy and How to Get Your First Print Right
Modern 3D printers work reliably out of the box — the era of constant calibration battles is largely over. This guide covers which printer to choose, what filament to start with, where to find models, and the slicer settings that actually matter.

How to Start Hobby Robotics: A Beginner's Guide to Arduino, Raspberry Pi & Building Your First Robot
Hobby robotics has never been more accessible — cheap microcontrollers, free tutorials, and an enormous community mean you can build a working robot in your first weekend. This guide covers everything a beginner needs: which platform to choose, what to buy, and a progression of projects that builds real skills.