Best Seam Ripper (2026): The Tool That Saves the Garment
Unpicking is not a sign of failure; it is most of sewing. Every fitted garment involves stitching something, trying it, and taking it apart again, and the tool that does that badly will put a hole in fabric you have already cut and cannot replace. A seam ripper is two pounds of insurance on a project worth considerably more.
HobbyStack may earn a commission from links on this page at no extra cost to you. Our picks are chosen on merit; the commission helps fund the research.
- Cut every third or fourth stitch from one side, then pull the other thread free. Do not slice down the seam.
- The red ball goes against the fabric — it stops the point diving into the cloth.
- Seam rippers blunt. A blunt one tears fabric instead of thread, and they cost almost nothing to replace.
- A big ergonomic handle matters if you unpick a lot. This is a tool used under frustration.
- Work on a flat surface in good light, and use a lint roller for the shredded thread afterwards.
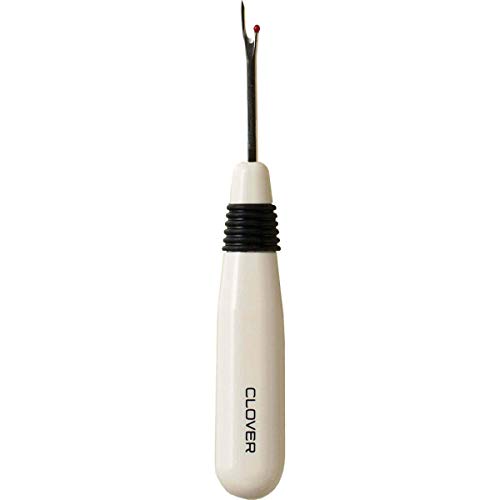 Our pickClover White ErgonomicPrecision unpicking$7Check price
 Dritz Large Seam RipperLong sessions and grip$10Check price
 Singer ProSeries Tool BundleA basket from nothing$15Check price
How to unpick without wrecking the fabric
The destructive method is to slide the ripper along under the seam and slice, which works on loose stitching and puts a hole in everything else.
The safe method takes slightly longer and never cuts fabric.
Work from one side only. Slip the point under a stitch, push until the blade in the curve cuts it, and repeat every third or fourth stitch — not every one.
Then turn the piece over and pull the thread on the other side. Because you have cut its partner at intervals, it lifts away in one long piece.
Then lint-roll, because the cut side leaves a great deal of short fluff that will otherwise end up in your next seam.
The red ball on the short prong is the safety feature: keep it against the fabric so the sharp point rides above the cloth rather than digging into it.
Blunt rippers are the real hazard
A seam ripper is a small blade in a curve, and like any blade it dulls. Unlike most blades, nobody thinks to replace it, because it is small and cheap and feels like a permanent object.
A blunt ripper stops cutting thread cleanly and starts dragging, which means you push harder, which is exactly when the point slips sideways into the fabric. Almost every hole made with a seam ripper is made with a blunt one.
The test is simple: if you have to push, it is done. A sharp ripper cuts a stitch with almost no pressure.
They cost a couple of pounds. Replace it once a year if you sew regularly, or the moment it starts feeling like work — this is not a tool worth being frugal about when the thing at risk is a half-finished garment.
 Best for precision
Clover White Ergonomic Seam Ripper
A fine-pointed ripper with a slim, shaped handle, and the fine point is what makes it the pick — it slips under a single stitch in dense fabric where a thicker point has to force its way in and takes some cloth with it. The blade is properly sharp, so stitches part with almost no pressure, which is the whole safety story with this tool. The slim handle suits detailed work and smaller hands. If you unpick for long stretches it is less comfortable than a fat-handled ripper, and the fine point is more fragile — lever with it and it will bend. Cheap enough that replacing it annually is trivial, which you should.
What's good
- Fine point gets under a single stitch
- Genuinely sharp — no pressure needed
- Slim handle suits detailed work
- Cheap enough to replace often
What's not
- Less comfortable over long sessions
- Fine point bends if levered
- Small cap is easy to lose
- Not the tool for heavy denim seams
 Best for long sessions
Dritz Large Seam Ripper Ergonomic Grip
A larger handle, and the reason that matters is that unpicking is repetitive work done at the end of a session when you are already tired and annoyed. A thin ripper cramps the hand within twenty minutes; a substantial grip lets you keep the controlled, light touch that stops the point wandering into fabric. The protective cap is a small thing that matters in a sewing basket, where an uncapped blade finds fingers. The blade itself is sturdy enough for heavier fabrics where a fine point struggles. The trade is precision: it is harder to isolate one stitch in fine, densely sewn fabric, so many people keep both and reach for whichever the fabric needs.
What's good
- Large grip — comfortable over long unpicking
- Sturdy enough for heavy fabric
- End of the handle pulls off and becomes the cap
- Keeps a light touch possible when tired
What's not
- Less precise on fine dense stitching
- Bulkier to store
- Point is thicker than the Clover
- Slightly dearer
 Best as a starter bundle
SINGER ProSeries™ Sewing Tool Kit
A bundle rather than a better ripper, and worth being clear about that — you get a comfort-grip seam ripper, five-inch thread snips, four-and-a-half-inch detail scissors and a thimble, which is close to the whole list of small tools a sewing basket needs and almost exactly the set you would otherwise assemble one purchase at a time. That is its case: starting from nothing. The ripper in it is perfectly serviceable without being as fine-pointed as the Clover or as comfortable as the Dritz. The teal colouring sounds like marketing and is genuinely useful, because small sewing tools disappear into fabric and a bright handle is findable. If you already own snips and scissors you like, buy one of the single rippers instead.
What's good
- Ripper, snips, detail scissors and thimble in one buy
- Close to the whole small-tool list for a basket
- Bright handles are findable in a pile of fabric
- Cheaper than assembling the pieces separately
What's not
- Not a better ripper — a bundle
- Wrong buy if you own snips and scissors already
- Ripper point is not as fine as the Clover
- Dearest here for the ripper itself
A sharp seam ripper parts a stitch with almost no pressure. The moment it starts dragging, you begin pushing — and pushing is exactly when the point slips sideways into the fabric. Nearly every hole made with a seam ripper is made with a blunt one, and a new one costs about the same as a reel of thread.
After unpicking
Two jobs finish the repair properly, and skipping them is why unpicked seams often look unpicked.
Remove the fluff. Cutting one side of the stitching leaves hundreds of short thread ends. A lint roller lifts them in seconds; leaving them means they get caught in the new seam.
Press the seam. The old stitching leaves holes and a crease that will show through the new line if you sew straight over it. Steam and press flat first, and on natural fibres the holes largely close.
And if you have unpicked the same seam three times, the problem is probably the pattern or the fit rather than your sewing. Stop, pin it, and try it on before stitching a fourth time.
Before you buy
Cut every third or fourth stitch from one side, then pull the other thread out.
Keep the red ball against the fabric.
Replace it yearly, or the moment it starts to drag.
Big handle if you unpick a lot, fine point for delicate fabric — many people own both.
Lint-roll and press afterwards.
Seam ripper questions
How do I use a seam ripper without cutting the fabric?
What is the red ball on a seam ripper for?
How often should I replace a seam ripper?
What should I do after unpicking a seam?
Buy a sharp ripper, use the red ball against the fabric, and replace it the moment it drags. The Clover is the pick for most sewing — a fine point that gets under a single stitch in dense fabric without taking cloth with it. The Dritz large grip is worth it if you unpick for long stretches and want your hand to survive. The Singer bundle only makes sense if you are building a basket from nothing and want the snips, scissors and thimble too.
Ready to actually do it?
The first garment construction quest takes an evening, and it tells you whether the gear was worth it better than any review can.
Start Garment ConstructionThe HobbyStack editorial team researches each guide against manufacturer specifications, published resources and practitioner sources. Every product is checked for availability and described against its current listing before publication, and prices are re-checked when guides are updated.
About our editorial process →More gear guides
All guides
Best Beginner Sewing Machine 2026: Brother vs Janome vs Singer
The first sewing machine is the difference between sewing as a satisfying hobby and sewing as the thing you tried for a month. Here's how to pick a beginner machine that actually works, plus the brands and models to skip.

Best Fabric Marking Tools (2026): Marks That Come Out Again
Every marking tool is a trade between two failure modes: a mark that disappears before you have sewn it, and a mark that will not come out afterwards. There is no tool that avoids both on every fabric, which is why experienced sewers own several and always test on a scrap first. The one that ruins a garment is usually the one nobody tested.

Best Fabric Shears for Beginners (2026): 3 Real Picks
There is one rule that matters more than which shears you buy: they never touch paper. Paper dulls a fabric blade fast, and a dull blade stops cutting cloth and starts pushing it, so your line wanders and the edge frays. That single habit separates shears that stay sharp for years from a pair that feels cheap within a month, and it is why sewers guard their fabric scissors and label them. Beyond that, the choices are simple: length, weight, and whether the handle suits your hand. Here are three good pairs and who each is actually for.

Best Sewing Machine Needles (2026): The Cheapest Fix for Bad Stitching
Skipped stitches, puckering, snapping thread and a machine that suddenly sounds wrong are almost always the needle, and almost never the machine. Needles are consumable — they blunt, bend a fraction and develop burrs long before they look damaged — and most people sewing badly are sewing with a needle that should have been binned months ago.

Best Thread Snips (2026): The Scissors You Keep Beside the Machine
Trimming a thread with dressmaking shears means picking up something heavy, opening it wide, and getting a blade near fabric you have just spent an hour sewing. Small scissors live beside the machine, open barely at all, and cut the thread where it leaves the seam. It is a tiny tool that changes the rhythm of sewing more than its price suggests.

Best Beginner Weaving Loom (2026): 3 Rigid-Heddle Looms to Start On
For learning to weave, the loom to start on is a rigid-heddle loom. It is simple, affordable, and quick to set up compared to a big floor loom, and you can weave real scarves, towels, and cloth on it within a day. The main choices are size, brand, and whether it folds. All three picks here are proper rigid-heddle looms from the two names weavers trust, from a complete starter kit to a folding loom you grow into.